Tuesday, October 31, 2017

Jeep CJ7 Leather Glovebox Bra... stuff keeps falling out


****************************************************

Stuff keeps falling out on the floor of the Jeep when opening the glovebox.
Decided to make a leather bra.

Used 8 ounce veg-tan leather. 

Took a piece of paper and rubbed it along the glovebox opening to create a pattern.  Transferred it to the leather and added a flap on each side and along the bottom.  Cut it out.

Stitched along the top contoured border to stiffen and give some style.

Wet the leather and used a ballpeen hammer to stipple the surface for a little texture.  Also matches my holster and gun belt.

Dyed the leather with Feibings Professional Oil Dye.

Built a wood press to form the 90ยบ bends in the side and bottom flaps that will be used to screw it down to the inside of the glovebox opening.  Wetted the leather prior to forming.

Buffed it up and burnished the edges.  Then finished with an acrylic top coat.

Used masking tape to transfer the screw holes to the leather.

Also added a bonded nylon door stop to keep the door from swinging all the way open.

Hope you like this idea.
Mike


Building A Dog Cushion For The CJ


*********************************************************************

Mountain rides are a passion for us and taking Cooper, our dog, is a must.  Unfortunately, in the CJ, there is no safe place for him.  Decided to make and upholster a cushion.  Watched a couple of great videos by Cechaflo on YouTube and got started.

Found some high density foam at the local auto upholstery supply.  They actually had a foam graveyard with all types of foam... for cheap.  This piece cost $10.  It is 6" thick and just fits my bandsaw which cut the sides and the curves very well.  Used an electric carving knife for the bevel.

To get the perfect size, I spray glued several pieces together.  Then marked reference points at midpoints on the sides and midpoints on the curves.  This will allow registration marks on the pattern to help keep panels from shifting while sewing.
Used rosin paper from the hardware store to cut patterns of the sides, pinned to foam to check fit and fine tune the curved sections.  Be sure to transfer all of the registration points to the paper.

It is important to pin all of the patterns on the foam together to make sure all of the seam lines meet.

Used weights to keep the pattern from shifting on the fabric, marked the reference points, then added 5/8" seam allowance.  Here you can see the zipper placket sewn to the head piece to form the band.

Used spring clips to hold the material together being careful to align guide marks.  Using a walking foot commercial sewing machine is helpful in keeping the material from shifting.  The cylinder arm also aids in sewing the curved and square corners.

Traced the actual pattern on the fabric, then added the 5/8" seam allowance.  It is then possible to sew right on the intended seam line rather than trying to follow the edge of the seam allowance.

The square corners were more challenging.  Sewing one side of each corner at a time allows more control rather than trying to continue around the corner in one sewing pass.

Decided to sew in one long zipper on three sides to make the cover easier to get on the foam.  Also checking fit prior to sewing on the bottom panel.

The clips are so much easier than pins.

For a first attempt, I'm happy with the fit.

Here is the cushion installed in the Jeep.  Overall size of the cushion is 6" x 12" x 28".  The back of the cushion rests against the step of the bed, snug fit between seats, and allows the seat belts to be fastened easily.  Next will be the harness.

Cooper approves this post.

Hope this helps you get your pal comfortably situated for those beautiful mountain rides together.

Mike


Monday, September 25, 2017

Jeep CJ7 Mirror Whistle Fix


The driver side mirror whistles above 35 mph and was driving me nuts.

I was able to determine that the ridges on the surface of the outer mirror rubber seal were whistling in the wind.  I tried wrapping black electrical tape around the mirror and, while it did fix the whistle, the tape didn't last long. It is the center groove in the rubber seal around the mirror that causes the whistling.

My solution: Wrap a length of black paracord tightly in the center groove all the way around and mark. Cut the cord and melt the ends together (heat both ends at the same time with a lighter and push together).  This eliminates the need for a knot and allows the cord to sit flush in the groove all the way around. Then stretch the loop of paracord back around the seal; it should fit tight. This may take some trial and error to get the length right.

Fixed the whistle, has lasted over 2,000 miles at highway speeds, and is virtually invisible.

Hope this helps,
Mike


Friday, September 8, 2017

CJ7 Wiper Repair

While driving down the road during a heavy rainstorm, the wipers on my CJ7 bound up and the driver side wiper shaft buckled the windshield frame.  After doing some research, apparently the CJ7 windshield frames are weak (fixed by Chrysler in the 1987 and later Wranglers) and prone to this problem.  The following is my fix.  Only time will tell if it holds up.

Note the driver side wiper shaft position.

Note how the windshield frame has caved in to the right side of the wiper shaft embossing.

Using a two foot length of 1/2" all-thread, washers, and nuts, fashion a prying tool and secure it to the windshield frame.  I used a layer of painters tape on the surface of the washers to protect the paint.

Double lock nut the tub side of the all-thread with a couple of fender washers, then tighten the nut on the outside of the windshield frame.  I used another set of doubled lock nuts further out that I could get a wrench on to tighten.  Then gently pry until the windshield frame is straight.  You can check for squareness (shaft to windshield frame) with a right drafting triangle or a carpenters square.  Be gentle with small corrections at a time so as not to crack the paint.

The linkages at both the driver and passenger side were bent.  I used pliers and a vise to straighten them out.  My bushings were not out of round.  Otherwise I'd have replaced the bushings or the entire linkage.

Found some 2" fender washers with 1/4" center hole and secured them to this jig.  I used a 2" diameter hole saw to cut "crescents" into two washers at the same time.

Used a free harbor freight tarp to mask the the windshield frame and set up my epoxy station.

Place the fender washers on either side of the windshield wiper shaft embossing and mark.  Then sand down to bare metal.  Sand the mating surface of the fender washers.  I also wiped with alcohol.

Use J-B Weld original formula (higher PSI rating than quick set) on both surfaces and press into place aligning the "crescent" cut with the embossing and leave 24 hours to set.

I am using a 5/8" grade 8 washer to reinforce the back side of the embossing.  You will have to cut the notch into the washer to accommodate the tab in the wiper shaft flange.  I bathed the shaft pivots in Tri-Flow for a week and slathered all of the bushings with lithium grease as well.


This is the proper linkage orientation from the Jeep Service Manual.
NOTE: There is a little adjustment in the motor position.  I moved it as far to the passenger side as possible to create a slight "bent knee" where all of the linkages meet on the driver side shaft.  

Proper wiper arm placement per the Jeep Service Manual.

Decided on the Crown replacement arms in black this time (originals were gray).  Did black wipers as well.  I plan on coating both sides of the windshield with RainX to allow for water sheeting and as a lubrication for the wiper blades.

Hope this helps.
Mike

Thursday, September 7, 2017

Relay Upgrade for H4 , Horn , Amp , and Heated Seats

This includes the wiring to upgrade to H4 headlights.

Decided to add a Cooper Bussmann relay box to the CJ in order to upgrade to H4 lighting, upgrade the horn, install a new amp behind the dash, and provide for future upgrade to heated seats.

After thinking about adding individual relays, I happened upon the Cooper Bussmann relay box from a guy on ebay who sells them with the relays and wiring tails already installed.  I sent him a request to extend all the tails to 10 feet and make one of them 10 gauge instead of his usual 12 gauge (this was for the amp).  This unit is equipped with five 30 amp switched relays and five unswitched 15 amp circuits.

Misc. parts assembled for upgrade (wire, loom, loom stays, bluetooth amp, horn, relay box, 60 amp circuit breaker, distribution busses, terminals, etc.).

Didn't want the amp seen (or easily stolen) nor did I need a stereo head unit.  I wanted to use iTunes on an iPhone via bluetooth to control the music.  I fabricated these brackets from some aluminum channel in order to mount the amp between the dash and the firewall.

Here are the amp and brackets mounted.  There is a spot between the heater vent and the control knob cables that just allows this Kenwood KAC-M1824BT, 400 watt amp, to fit.

Relay box and 60 amp circuit breaker mounted to passenger fender.

Relay box and 60 amp circuit breaker mounted to passenger fender.  The relay box came with a 60 amp fuse, but if something ever failed I don't think I'd be able to find a 60 amp fuse (nor would I want to fool with it on the side of the road) so I went with the breaker.  Power comes directly from the battery via the starter solenoid. Ground comes directly from the battery.

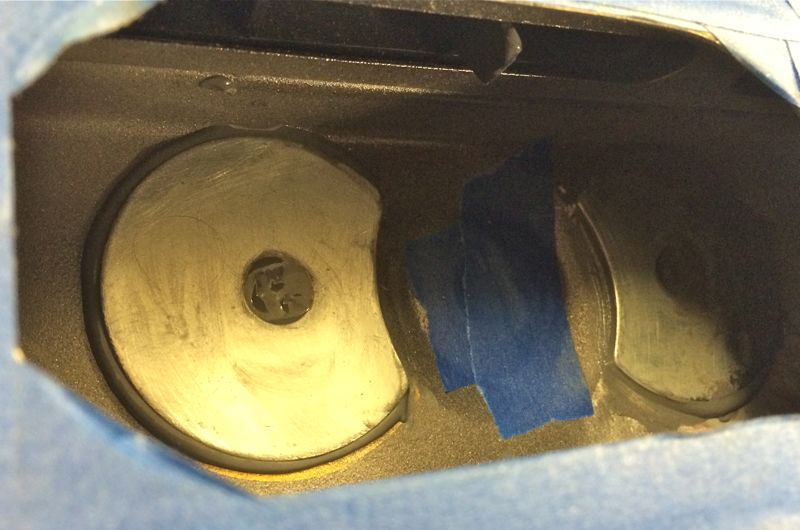
Inside the Cooper Bussmann box.  I removed the five unswitched fuses and wiring to reduce bulk and clutter.  I can add them back when, and if, needed.

Bought an air ooga horn from Harbor Freight for $11, drilled a new hole in the fender and ran the wire from the relay behind the grill with the headlight wiring.

All of the wiring for the lights from the existing fusebox run by the horn in the loom.  From there I spliced new wire onto the low beam, high beam, and horn wires and ran them behind the grill and over to the relays.  Then ran the power from the relays back via the same route.

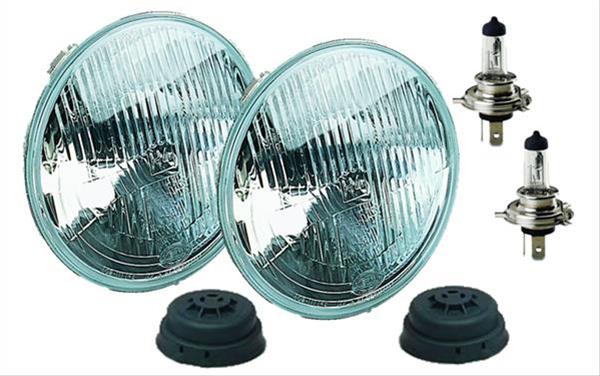
Eventually, the Hella H4 headlights will go in.  I've also included the best value LED headlight info from Auxbeam.  Ultimately, the LED lights look too modern for the CJ.


I used new ceramic headlight connectors that are abundant on ebay.

Added a battery disconnect as a precaution.  You can just see a coupling nut attached to the heater bolt as a stand-off for the battery negative wire coming to the firewall.  Decided to use this stand-off idea instead of the distribution busses.

Drilled a hole in the firewall in order to run the power leads to the amp and heated seats.  Used a grommet in the firewall to protect the wires.

Cut a hole for, and mounted the amp remote control pad to the radio blanking plate.  The mounting pins on the blanking plate broke off so I drilled them out and mounted it with buttonhead stainless bolts.  The iPhone mounts via a RAM Mount in one of the existing dash mounting bolt locations.  Also added a dual 2.1 amp USB charging port where the old cig. lighter used to be.  This is intended to keep both of our phones charged while out for extended periods.

I've never done any automotive wiring, but am generally good with electrical, so after some research here and elsewhere, decided this was a good way to get this job done.

If you have suggestions for improvements, let me know.  It could help the next guy.